Ladies and gentleman, a guest post by MG!
As you may know, my project for the summer was to start baking my own bread. For my birthday, a scale, a bench scraper, a bread baking book and a journal to track my progress were bestowed upon me by a mysterious benefactress. I have yet to make use of the book, it is a little advanced for me to just start with, but the other devices are seeing some action. I decided that my first bread recipe (not counting the various banana breads I’ve made in the past) should be the famous no-knead bread recipe from Jim Lahey at the Sullivan Street Bakery as adapted by Mark Bittman in his Minimalist column.
The first time I made the recipe, it was a disaster. The bread mixed well into a dough, but when I came back 14 or so hours later, it was like pancake batter. I decided it must be my yeast, which had been open for more than 6 months, and thus possibly really, very, truly dead. So I got some new yeast and tried again, this time was different - no, wait - it was also a horrific failure. I made several more changes for a third try, but I told myself I wouldn’t waste any more flour if this one didn’t work out.
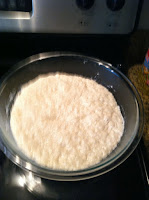
Various stages of the process.
The first change I made was to my ingredients. Previously, I had been using all-purpose flour; the recipe says you can and that’s what I had. Upon further inspection at the grocery store, bread flour (something one assumes is meant for my task) was about the same price as a 5 pound bag of APF, so I bought some.
Next, I also did some research on the Internet. I learned during my searches that I was not the only one to end up with pancake batter instead of bread dough. There were two main reasons for my failure: 1. I wasn’t using instant yeast and 2. I was probably letting it rise too long (such a thing is possible). I learned how to correct my yeast deficiencies from Deb at Smitten Kitchen (she talks about it here). Basically, if you are using dry active yeast instead of instant yeast (dry active is more common and most likely the only option at your local store), you actually need to use ⅓ teaspoon instead of the ¼ teaspoon the recipe indicates. I also learned from the comments in that posting that my fallen dough was caused by the lengthy rise in my warm, humid Washington, DC apartment.
Finally, I believed that the dough was too wet from too much water so I just used 1½ cups of warm water to make the dough.
Armed with this knowledge I struck out on my third attempt. It was a resounding success. I used warm water, adding a cup at a time and then the extra half a cup to get a good sticky texture. I only let the dough rise for 11 hours (I started it at 6:30am and went to bread baking upon my arrival home from work) and presto, 3 more hours later, I had bread.
Good with peanut butter. Or butter. Or just by itself, right out of the oven.
No-Knead Bread
Adapted from Jim Lahey of Sullivan Street Bakery and Mark Bittman at the New York Times, with knowledge from Deb at Smitten Kitchen
Makes one 24 ounce loaf.
3 cups all-purpose or bread flour, more for dusting
¼ teaspoon instant yeast or ⅓ teaspoon dry active yeast
1¼ teaspoons salt
1½ cups warm water
Cornmeal or wheat bran as needed.
In a large bowl combine flour, yeast and salt. Add 1½ cups warm water, and stir until blended; dough will look sticky, but should form into a mass. Cover bowl with plastic wrap. Let dough rest at least 12 hours, preferably about 18, at warm room temperature, about 70 degrees. If your kitchen is warm, the first rising time can be as little as 8-10 hours.
Dough is ready when its surface is dotted with bubbles and it clearly is a solid, foldable mass. Lightly flour a work surface and place dough on it; sprinkle it with a little more flour and fold it over on itself once or twice. Cover with plastic wrap and let rest about 15 minutes.
Gently and quickly shape dough into a ball, you can flour or wet your hands for this step. Generously coat a cotton towel (not terry cloth) with flour, wheat bran or cornmeal; put dough seam side down on towel and dust with more flour, bran or cornmeal (I just used all-purpose flour). Cover with another cotton towel and let rise for about 2 hours. When it is ready, dough will be more than double in size and will not readily spring back when poked with a finger, but should still be pliable.
Half an hour before dough is done with its second rise, heat oven to 450 degrees. Put an oven-safe heavy, covered pot in the oven while it preheats (I used my trusty red Dutch oven). When dough is done with the second rise, carefully remove pot from oven. Slide your hand under towel and turn dough over into pot, seam side up; it may look like a mess, but that is not a problem. Shake pan once or twice if dough is unevenly distributed; it will straighten out as it bakes. Cover with lid and bake 30 minutes, then remove lid and bake another 15 to 30 minutes, until loaf is golden brown and irresistible looking. Cool on a rack.
*Note: This bread has something of a thin crust and may actually be easier to cut when slightly warm.


No comments:
Post a Comment